Do you need help with how to assemble a futon? Don’t worry we have got you covered. We will explain this article in Four different ways. First, we will explore the general way to put a futon together (helpful for all futons); second, we will learn how to assemble a wooden futon (bi-fold and tri-fold futon); third, we will learn how to assemble a metal futon; and fourth, we will go through the essential futons which have a unique assembly.
Over time, manufacturers have introduced new futons to markets with unique assemblies, so we will also explain them properly. After following our guide, you will not face problems; if you encounter an issue, follow the manufacturer’s assembly instructions.
If you are heavy and want to buy a sturdy futon for a heavy person, then click here.
Table of Contents
How to Put a Futon Together?
This is the first part of our article, which is based on general steps used to assemble futons.
Tools and Materials You’ll Need:
- Before you get started, make sure you have the following tools and materials on hand:
- Futon frame components (arms, backrest, seat)
- Futon mattress
- Screws and bolts (usually provided with the futon)
- Allen wrench (included or a compatible size)
- Screwdriver
- Instruction manual (if available)
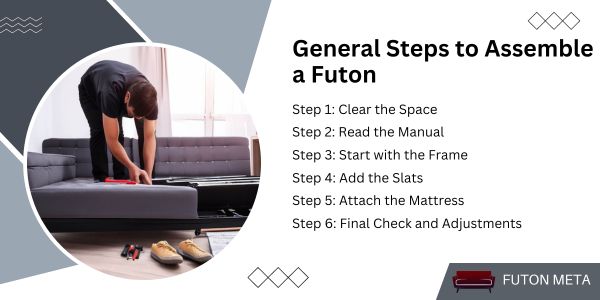
Step 1: Clear the Space
Choose a bright and roomy area to assemble your futon. Lay out all the components and tools within easy reach. This will help you avoid confusion during the assembly process.
Step 2: Read the Manual
If your futon has an instruction manual, read it thoroughly before you begin. Please familiarize yourself with the components’ names and the general assembly process. This will make you assemble your futon smoother.
Step 3: Start with the Frame
Begin your assembly with the frame components. Generally, you’ll have arms, a backrest, and a seat. Follow the instructions in the manual to connect these pieces using the provided screws and bolts. An Allen wrench is the primary tool used for this step. Make sure to tighten the screws securely, but avoid over-tightening, as it could damage the futon wood or metal.
Step 4: Add the Slats
If your futon has slats that support the mattress, insert them into the seat portion of the frame. These slats provide the best support for the mattress and contribute to your comfort while using the futon as a bed.
Step 5: Attach the Mattress
Once the frame is securely assembled, it’s time to place the futon mattress onto the seat portion carefully. Ensure that the mattress is centered and aligned with the backrest properly. Some futons have straps or Velcro to keep the mattress in place.
Step 6: Final Check and Adjustments
Give your assembled futon a thorough inspection. Check all the screws and bolts to make sure they are tightened correctly. Test the folding mechanism if your futon is designed to transform. Sit and lie down on the futon to check its comfort and stability.
You can also read about, how to stop futon from folding in the middle.
How to Put a Wooden Futon Together?
This is the second part of our article, based on assembling a bi-fold and tri-fold futon. Wooden futons are commonly available in bi-fold and tri-fold frames, so let’s start.
Assembling a Bi-Fold Futon:
1- Gather All the Essential Components:
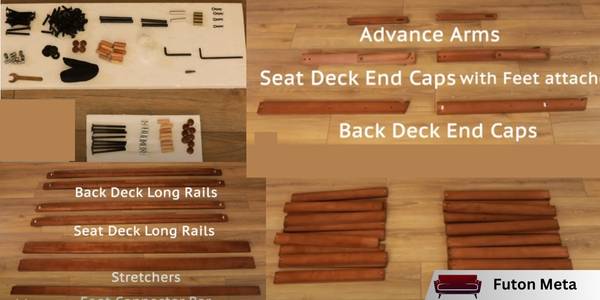
Before starting your assembly journey, gathering all the essential components mentioned in the assembly guide specific to your model is crucial. Check carefully that you have the 2 stretchers, 2 arms, back and seat decks, clevis pins, cotter pins, slide rollers, and the necessary screwdriver. This careful preparation will set the stage for a smooth assembly process.
2- Constructing the Frame:
Attaching the stretchers to the arms is the foundational step in making the bi-fold futon frame. Follow the assembly guide, insert screws through armholes and secure them to corresponding holes in the stretchers. Maintaining a slightly loose connection at this stage ensures flexibility for upcoming steps. This combination of stretchers and arms marks the birth of the futon frame.

3- Join the Decks:
Lay the front and back decks flat, aligning them along their designated hinge points. For this connection, usually, clevis pins and cotter pins are used. Insert these pins into the hinge points and unite the decks securely. This alignment creates a foundation that will seamlessly fold and unfold the frame, accommodating your comfort needs.

4- Navigating the Rollers:
Some bi-fold futon models feature slide rollers, essential for effortless transformation. If your futon model requires these, you’ll find them on the back deck. These small and crucial parts facilitate the smooth conversion from sofa to bed and vice versa.

5- The Perfect Combination:
Gently place the assembled deck into the frame, ensuring the slide rollers find their place in the grooves running along the arms. This critical step merges the frame and the deck for stability and functionality.

6- The Final Touches:
With the deck in place, it’s time to elevate the security of your bi-fold futon. Employ your screwdriver to tighten the previously loosely attached screws. This meticulous fastening ensures your futon withstands everyday use with unwavering strength.

7- Functional Transformation:
One of the crucial aspects of a bi-fold futon is its transformation from sofa to bed. Check the movement of the futon frame while converting from sofa to bed. If this movement is not effortless, check the rollers’ placement.

8- Embracing Comfort:
To complete the assembly process, lay the mattress at the top of the flat deck. The careful positioning ensures that your bi-fold futon is ready to use.

You may like this, high-quality futons for dorm rooms.
Assembling a Tri-Fold Futon:
1- Setting the Stage for Essential Components:
Before initiating your tri-fold futon assembly, gather all the components in the assembly guide, from the 2 arms and 2 stretchers to a slat rack with 3 sections, clevis pins, cotter pins, sliders, allen wrench, and screws. Having everything at your fingertips ensures a smooth assembly process.
2- Organize the Frame:
Start by attaching the stretchers to the arms, the first step in constructing the tri-fold futon’s frame. With the guidance of the assembly guide, insert screws through the armholes, securing them to the corresponding holes in the stretchers and maintaining a slightly loose connection which initially allows for flexibility to slat connection in arms. This fusion of stretchers and arms forms the framework for your futon.
3- Bringing Slats Together:
Lay the 3 slats flat on the floor and align them along the hinge points specified in the assembly guide. Clevis and cotter pins, trusted connectors, play a vital role in this step. Insert these pins into the hinge points to create a secure bond between the slats. This alignment is the foundation for the tri-fold mechanism that seamlessly transforms your futon position.
4- Attach Slide Rollers to the Slats:
Usually, tri-fold futon models come with slide rollers, an essential part for effortless position changing. Check if your futon includes these rollers, traditionally found on the slats. These essential components facilitate the smooth transition from sofa or chair to bed. If your model requires roller attachment, follow the assembly guide for precise installation.
5- Unifying the Components:
Gently place the assembled slats into the frame, ensuring the slide rollers fit into the grooves along the arms. This union of frame and slats establishes a stable and functional base for your tri-fold futon.
6- Tighten all the screws:
Use your trusty screwdriver to tighten the previously loosely connected screws in the arms and stretches. Do not tighten screws too much that damage your frame.
7- Check Effortless Transformation:
Now check the futon transformation so that your futon can change its position without sticking. Hold the front slat and push in the forward direction; if your futon changes its place, then you have done it. If you face a problem, check its rollers in grooves that may need to be in a better position. So, loose the arms and insert the rollers in grooves.
8- Embracing Style and Comfort:
Complete the assembly by placing the mattress onto the slats. This careful placement ensures your tri-fold futon is ready for both style and comfort, which gives relaxation and enhances the aesthetic of your living room.
Assembling a Simple Tri-Fold Futon Without Arms:
1- Check All Necessary Parts:
For assembling your tri-fold futon without arms, you need to check all the essential components through the assembly guide for this model. Generally, you will have 3 slat racks, 6 baseboards, 4 legs, wood screws, cotter pins and clevis pins.
2- Combine Baseboards:
Check the hinge points in your baseboards and combine one baseboard with another through these holes. For combining, use clevis pins and cotter pins at the hinge points. Similarly, connect the third baseboard with another end of the second baseboard.
Make sure that you have connected 4 legs with the middle baseboard. Also, check the sizes of baseboards while connected. All baseboards must be the same size in connected mode.
3- Join Slat Racks and Baseboards:
Put slat racks on the baseboard and line up the holes of slat racks with baseboard holes. After joining the spot, place wooden screws through these holes and secure them through the screwdriver. Repeat this process until you have done it.
4- Check Futon Transformation:
Hold the front end and push forward until your futon changes its position into a sofa. Check the baseboards’ hinge points if your futon has transformation issues, especially clevis and cotter pins.
5- Add Mattress to Futon:
First, lay flat your futon frame and then put a futon mattress on it. Now, your tri-fold futon without arms is ready to use.
How to Put a Metal Futon Together?
1- Find a Suitable Place:
If you want to assemble your metal futon, find a suitable place where you can quickly assemble your futon. This will boost your work and will take less time.
2- Collecting All Components:
Before initiating your assembly process, please collect all parts of the metal futon according to your assembly guide. You will need 2 arms, 6 stretchers, 4 metal slats, 2 retainer clips, a screwdriver machine, 3 clips (used in the middle of frame), 2 metal rods (used as legs in the middle), 2 metal transformers and screws.
3- Constructing the Frame Base:
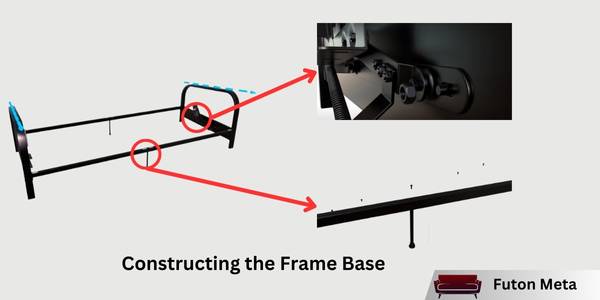
Start by attaching the metal transformers (used to convert the futon to the bed position) with arms through screws. Now join the three stretchers through screws to make a large stretcher and do the same for the remaining stretchers. Also, add a metal rod in the middle of each large stretcher. You have two large stretchers, which should be attached with arms at hinge points. At this point, your frame base is ready.
4- Joining Metal Slats Together:
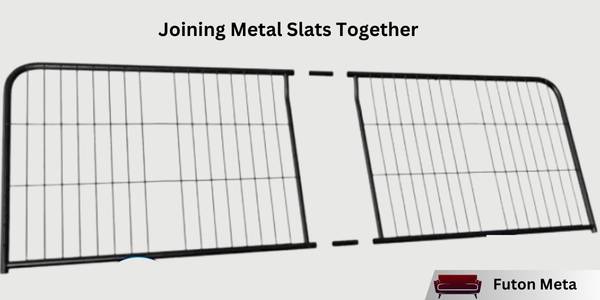
Lay two metal slats in opposite directions and join them through a small cylindrical pipe on each side. Insert screws and tighten them through a screwdriver machine. Do the same process for the other two slats. Also, add a thin, flat metal bar in the middle of each slat.
5- Combing All Components:
Softly and gradually add the assembled slats to the metal transformer and tighten them with screws. Also, add retainer clips on the metal slat, ensuring these clips must be at the front seat part, not the back part. These retainer clips will support your mattress and prevent it from sliding. Remember to add small hooks in the middle of the frame to keep your futon from folding in the middle.

6- Check Futon in Various Angles and Positions:
Examine all parts and transformations of the futon to see whether your futon can convert from sofa to bed position. If you have difficulty changing angles, check the metal transformer or screws. If you can not solve it, then contact the manufacturer. The futon may have some technical issues from the company side.
7- Add Futon Mattress:
The last step is in two parts; first, you will find some mini-padded stickers used to protect stretchers and slats from each other. As mentioned in the picture below, make sure to stick these stickers on stretchers at the proper spot.
Second, add a cozy and stylish futon mattress on the futon frame to complete the final touches. Stay calm; your futon will not slip on the frame due to the retainer clips in front of the seat.
How to Put Modern Futons Together? New Futons in Markets
This is the fourth part of our article exploring the modern and new futons. These futons have specific structures that require particular assembly. So let’s start;
1- Assembling a Flamaker and Yaheetech Futon Sofa Bed:
a- Find a Suitable Place for Assembly:
The first and most crucial step for assembly is reliable space. If you have roomy space, lay all parts of the futon, which will help you to assemble it within a few minutes.
b- Gather the Components:
The Flamaker futon has many components, which include a packet of nuts and bolts, hex screws, 2 center legs with 4 corner legs, armrests, and cup holders (hidden in the back of the futon), and 2 pillows. You can also assemble it through the guidelines of the manufacturer.
c- Add Legs to the Futon:
First, open the back of the futon and remove all the parts. Now, take the upper legs and twist in the holes. Now, join the lower and middle legs with this futon through hex screws and a drill machine. We used an allen wrench for tightening the screws.
d- Attaching of Cup Holders:
This step is super easy, take cup holders and attach them with bolts in the back while using the drill machine.
e- Put Armrests:
The final step is to put armrests, which are Velcro. These armrests have Velcro along the bottom so you can place them anywhere. They are sticky and will not slip on the futon.

2- Assembling an Opoiar and IULULU Futon:
Both futons have the same structure and assembly procedure, so let’s start.
a- Removing Packaging Materials:
First, remove all packaging material from the futon and lay all parts on the floor. Ensure you can take help while unboxing your futon if you are elderly.
b- Components of Futon:
These futons have 2 metal middle legs and 4 metal corner legs. They also contain bolt kits and product installation guides. You can follow our guidelines if you do not find an installation guide. You will see these things in a small zippered compartment on the underside of one of the cushions.
c- Futon Alignment and Finishing:
Align your futons in such a way that they face each other in the center. After alignment, screw the middle legs while the two cushions are held together. Now screw the corner legs individually, and your futon is ready.

3- Assembly of TYBOATLE and Milliard Futon:
These two futons have the same procedure of putting together and the same structure, so let’s assemble them.
a- Finding a Suitable Place:
To assemble your futon, you must find a suitable and roomy space. If you find the perfect place, you can take out all parts of the futon from the right corner of the futon.
b- Components of Futon:
These futons contain 2 middle legs, 4 corner legs, 2 armrests, screws, and a main body. You can contact customer service if your futon is missing any of these parts.
c- Fixing legs:
Now it’s time to fix the legs by taking some screws and legs and setting them in the middle of the futon. Also, fix the corner legs; the front corner legs do not require screws, only twice in the hole.
d- Adding Armrests:
The last step is all about adding armrests to the futon. It is super easy only if you focus on clips in armrests. Insert these clips into the side of the futon, and your futon is ready to use.

Final Thoughts:
Assembling a futon is a simple task. Following this guide and referring to the provided instructions, you can quickly assemble your futon and enjoy its functionality and comfort. Take your time, stay organized, and soon enough, you’ll be lounging on your newly assembled futon like a pro!
Also, you do not need to search more about how to assemble a futon because we have covered many assembly processes. But if you find a futon with a different assembly process, you can follow manufacturer guidelines or contact us for this futon. We will reply to you as soon as possible. Stay happy and spread love; thank you.


